Introduction
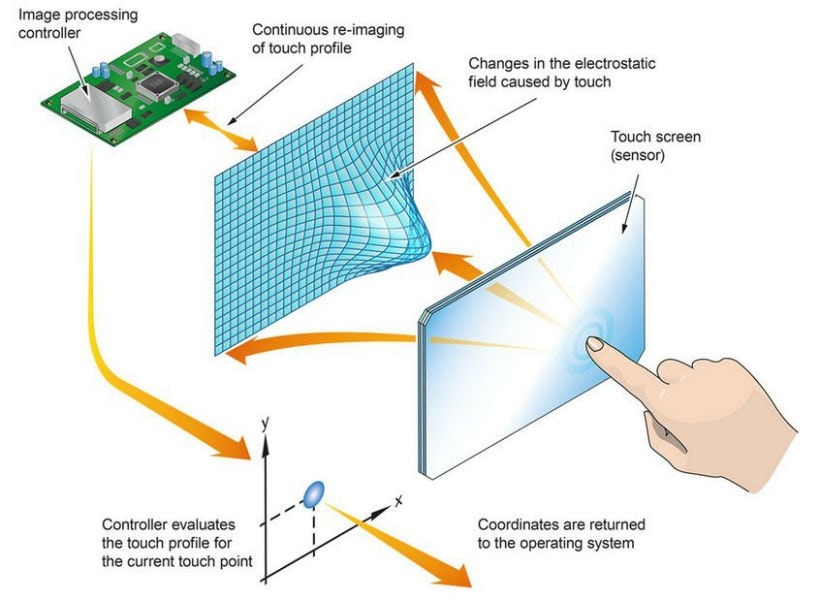
Touch sensors are used in everyday devices like smartphones, lamps, and security systems. The good news? You can build your own simple touch sensor using basic electronic components! This DIY project is perfect for beginners, introducing concepts like conductivity and circuit design. In this step-by-step guide, you’ll learn how to create a basic touch sensor that lights up an LED when touched. Let’s get started and bring your touch-activated circuit to life! ⚡🧩
🧩 Components You’ll Need
- 🔋 Power Source: 9V battery or 5V power supply
- 💡 LED: For visual feedback when the sensor is activated
- 🛑 Resistor (220Ω): Limits current to protect the LED
- ✋ Touch Plate: A piece of copper foil, aluminum foil, or a coin
- ⚡ Transistor (NPN, e.g., BC547): Acts as a switch when touched
- 🔗 Breadboard: For assembling the circuit without soldering
- 🧵 Jumper Wires: Connect components on the breadboard
🛠️ Tools You’ll Need
- 📏 Multimeter: To measure voltage and test connections
- ✂️ Wire Strippers: For preparing jumper wires if needed
- 🧹 Needle-Nose Pliers: Useful for bending wires
⚙️ How the Touch Sensor Works
When you touch the touch plate, your body acts as a conductor, allowing a small amount of current to flow into the transistor’s base. This current activates the transistor, which then allows a larger current to flow from the collector to the emitter, lighting up the LED. The transistor acts like an electronic switch that turns on when it detects touch.
📝 Understanding the Components
🔸 Transistor (NPN, e.g., BC547):
- Has three terminals: Base (B), Collector (C), and Emitter (E)
- A small current at the Base allows a larger current to flow from Collector to Emitter
🔸 LED:
- Emits light when current flows through it
- Longer leg (anode) goes to positive, shorter leg (cathode) goes to negative
🔸 Resistor (220Ω):
- Limits current to prevent the LED from burning out
💡 Step-by-Step Guide to Building the Touch Sensor
Step 1: Prepare Your Workspace
- Choose a clean, well-lit area with a flat surface
- Gather all components and tools before starting
- Keep the battery disconnected until the circuit is fully assembled
Step 2: Insert the Transistor
- Place the transistor on the breadboard with each leg in a separate row
- Identify the legs: Base (B) is in the middle, Collector (C) on one side, and Emitter (E) on the other
Step 3: Connect the LED and Resistor
- Insert the LED’s longer leg (anode) into the same row as the transistor’s Collector (C)
- Connect the shorter leg (cathode) to the negative rail of the breadboard
- Attach a 220Ω resistor from the transistor’s Emitter (E) to the negative rail
Step 4: Connect the Touch Plate
- Attach a piece of copper foil, aluminum foil, or a coin to a jumper wire
- Connect this wire to the transistor’s Base (B)
Step 5: Connect the Power Source
- Connect the positive terminal of the 9V battery to the breadboard’s positive rail
- Connect the negative terminal of the battery to the negative rail
Step 6: Test the Circuit
- Touch the copper foil or coin with your finger
- The LED should light up when you touch the plate and turn off when you release it
🧪 Troubleshooting Tips
- 💡 LED not lighting up? Check the orientation of the LED and the connections to the transistor
- 🔥 Transistor getting hot? Ensure the resistor is correctly placed to limit current
- 🚫 No response when touching the plate? Verify that the touch plate is connected to the transistor’s Base (B) and that the battery is charged
⚠️ Safety Tips
- Always disconnect the battery when assembling or modifying the circuit
- Use components within their voltage and current limits to prevent damage
- Avoid touching exposed wires when the circuit is powered
🌍 Real-World Applications of Touch Sensors
- 📱 Smartphones: Capacitive touchscreens for navigation and typing
- 💡 Touch Lamps: Lamps that turn on and off with a simple touch
- 🏡 Security Systems: Touch sensors for alarms and access control
- 🧠 Medical Devices: Touch-sensitive controls for improved accessibility
🔮 The Future of Touch Sensor Technology
Touch sensors are evolving beyond basic circuits, enabling advanced features like multi-touch, pressure sensitivity, and gesture recognition. Flexible touch sensors are now being integrated into wearable devices, smart textiles, and IoT systems, shaping the future of human-machine interaction. By mastering the basics, you’re opening the door to more advanced projects and innovations!
📝 Conclusion
Congratulations! 🎉 You’ve successfully built a simple touch sensor using basic components. This project introduced you to essential electronics concepts, including conductivity, transistor switching, and circuit design. As you gain confidence, try experimenting with different components, adding more LEDs, or integrating a microcontroller like Arduino for advanced touch-sensitive projects. The possibilities are endless—keep learning, building, and creating! 💡🔋✨


